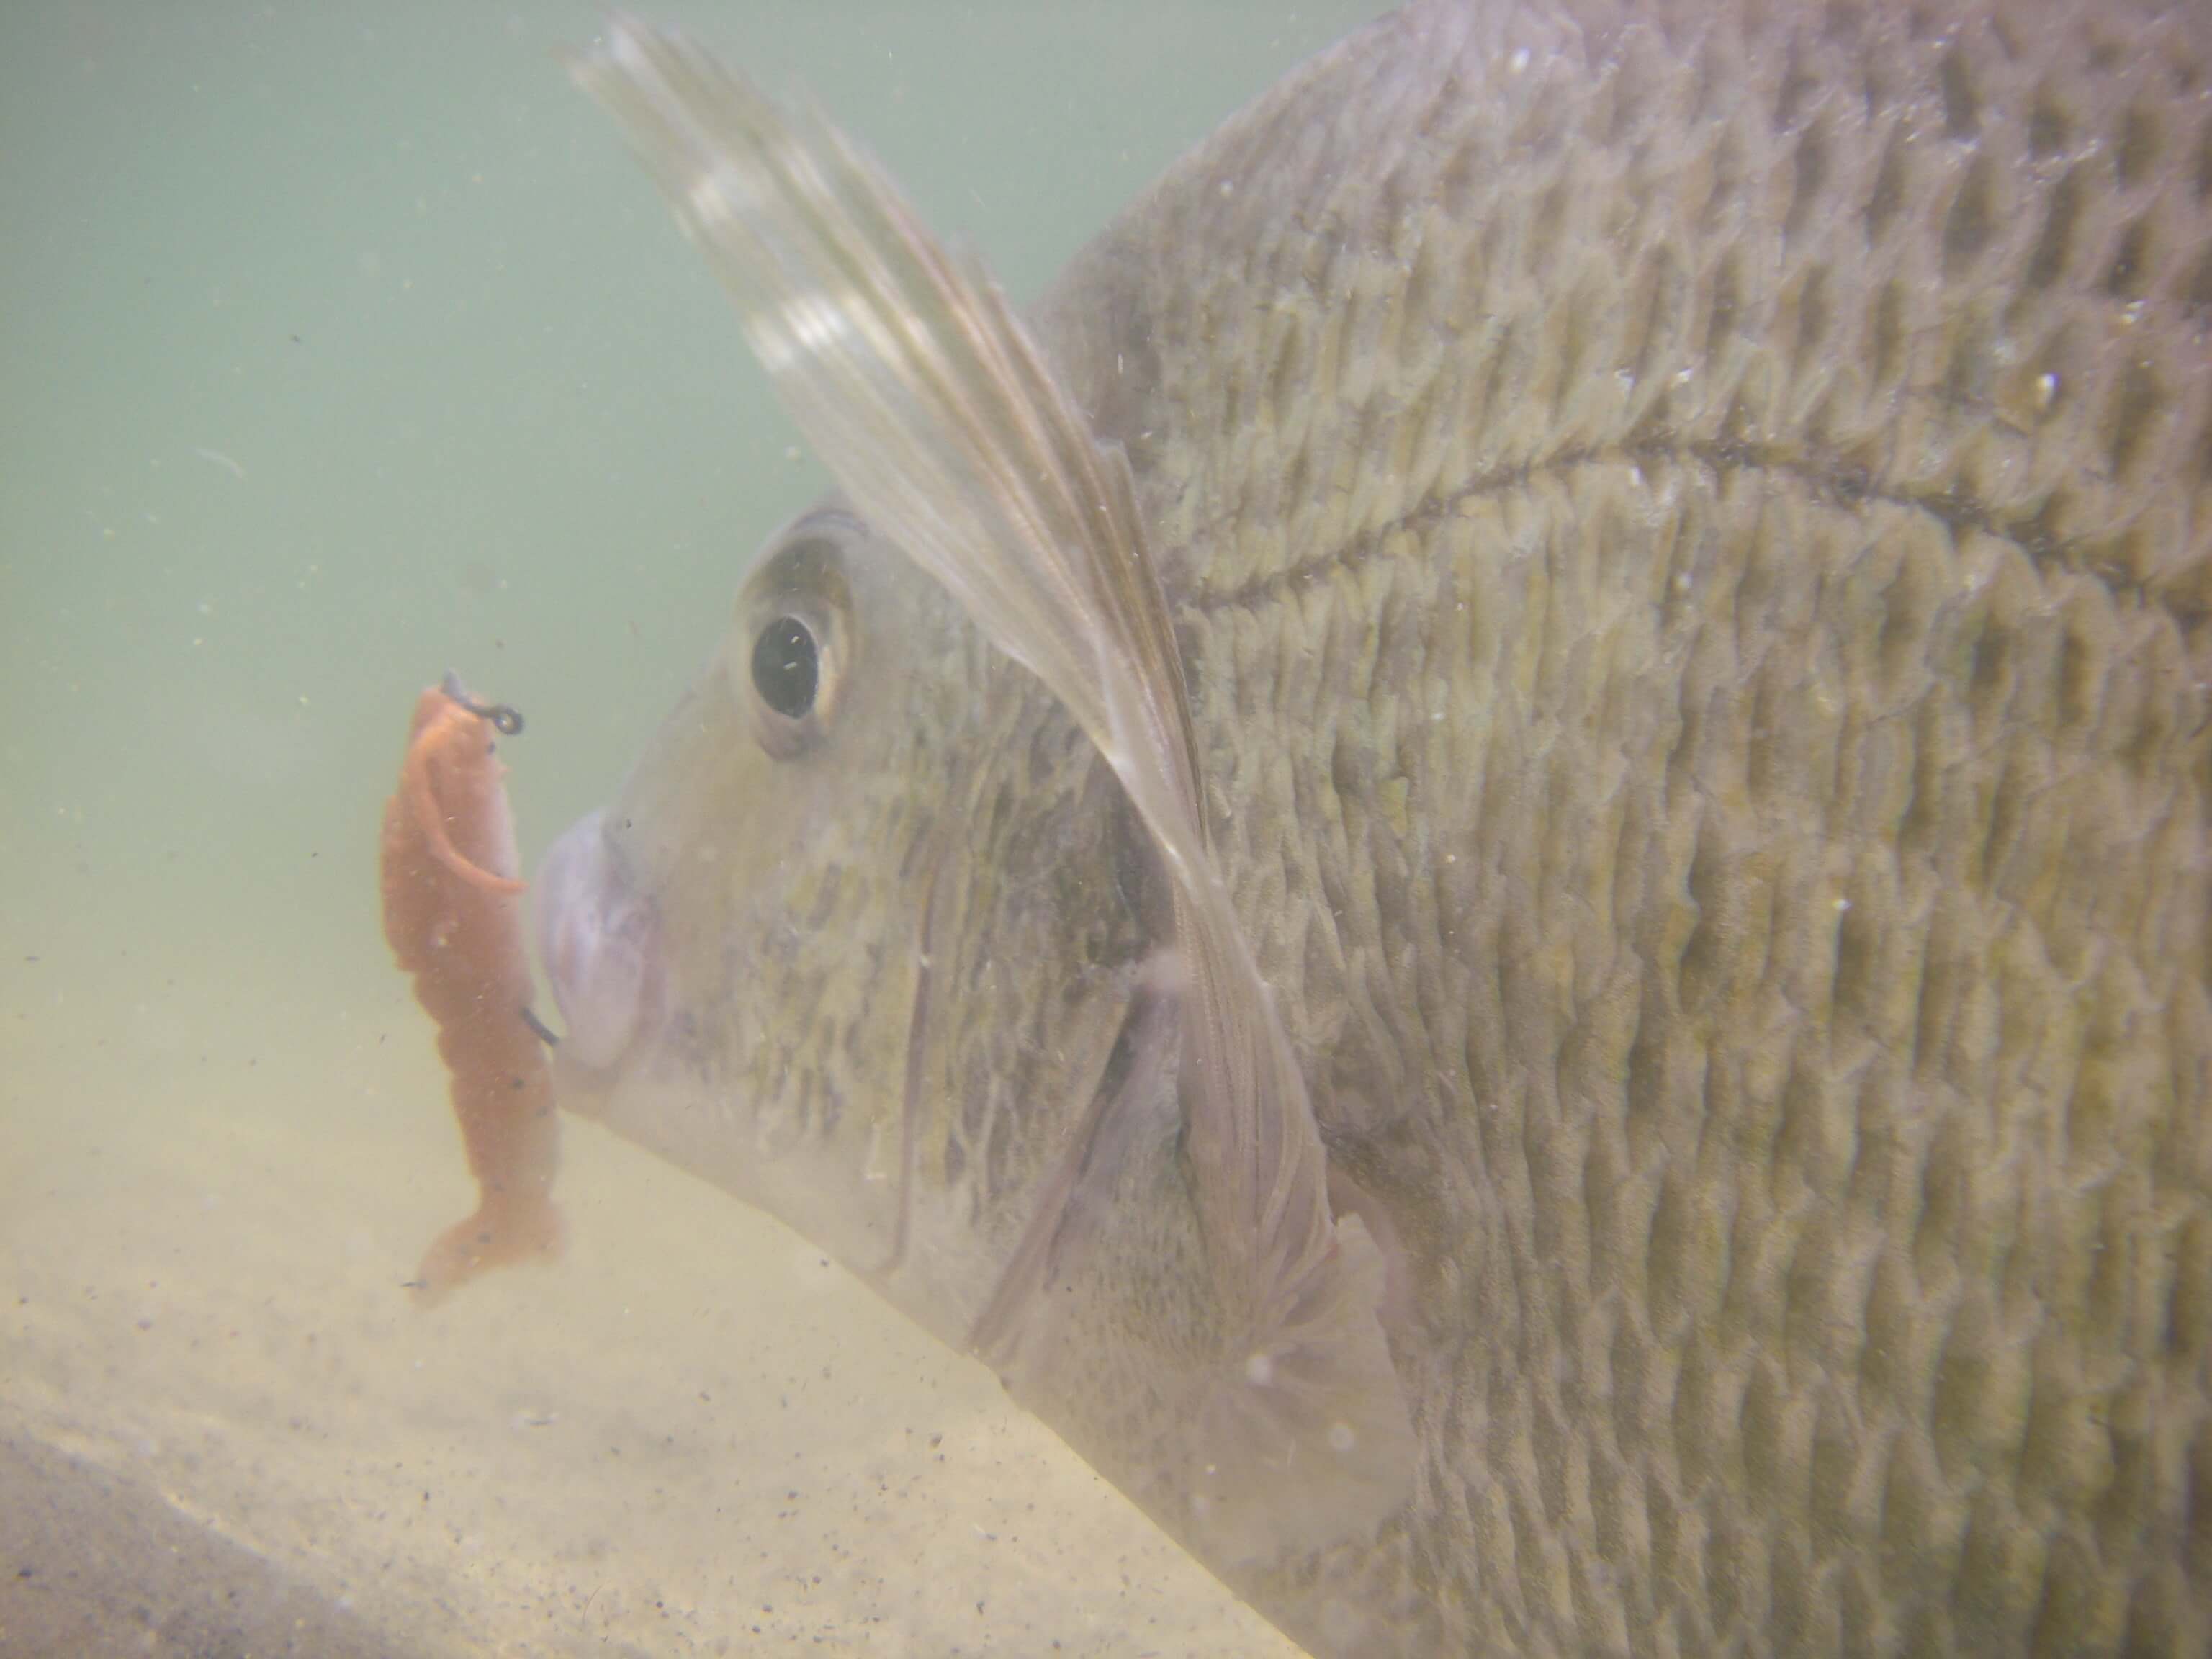
There are hundreds of estuaries and river systems sprinkled along the coast lines of Queensland, NSW and Victoria and some of the best fishing for big black bream and yellowfin bream is during our cooler months from just before Easter until the start of summer. One thing that does remain relatively consistent though is the strategies behind how best to find and approach bream.
Tactics
During these times bream usually bite well in these areas as they are there to feed. This makes shallow water bream tactics relatively easy targets and they will gladly take a wide range of presentations. Small soft plastics such as creature, grub and crustacean imitations in the 2 or 3 inch size range are proven performers over many seasons, throughout many systems. Jig head weight for both yellowfin bream and black bream should be sufficient to cast the distance required and reach the optimum depth you intend to work your presentation. You will need to carry a range of jig head weights as minor decreases or increases by as little as half a gram can be the difference in generating bites and not. Other factors to consider are wind direction and velocity. A stiff breeze hitting you side on can collect your line, form a large belly in the braid and drag your light soft plastic away from the area you intended to work. In these scenarios, working the area with a suspending hardbody or a small metal blade can turn the tables on a tough session with soft plastics.
If the breeze is coming from behind you or it’s only light, then all manner of presentations are viable options. Weightless presentations are gaining popularity and should not be overlooked. Jig heads with a slither of lead moulded to the upper end of the hook shank are another high-end presentation option, which allow a natural dead drift when you pause your soft plastic during a retrieve. Attaining a super slow drop on the pause is an absolute killer method on flats bream. A lightly weighted jig head with a soft plastic body that has a slightly wider, fat body, can assist in slowing down the speed that a presentation ‘drops’.

Where to find bream
The edges are where you will find bream during the cooler times and there are several indicators to look for. Prime indicators are ‘holes’, ‘digs’, or ‘turn overs’ sprinkled along the bottom. To pinpoint these locations you will need to get in close to the edges and slowly drift across the bay or shoreline while closely observing the bottom. Water depths between half a metre and two metres can easily be penetrated with good quality polarizing sunglasses. Look for changes in the colouration of the bottom. This means bream have been feeding here within the last tidal cycle or two. The digs and holes are not always the creation of feeding bream, as whiting, trevally, blackfish and of course stingrays are well known to fossick throughout the loose sand in search of food. But if there are more than six or so in one tight area they are most certainly bream.
Often they will be small pockets of water where feeding bream have been nosing in the soft substrate, turning over the bottom in search of a variety of crustaceans and invertebrates. Small crabs, worms, nippers and numerous other tasty morsels are all on a hungry breams shopping list. Depending on the creatures available (pending time of year, water temperature, and characteristics of that particular waterway) bream may just scratch the first few millimetres of soft sand and mud or gouge their way deep into the bottom to dig out that elusive offering.
Some holes as deep as 200 or 300 mm where bream have been feeding. The two-fold benefit of these deeper holes for the fish is that bream will often use them as cover if they are not in feeding mode. Numerous times I have been drifting over vast stretches of uniform, almost bland looking flats, when I have spooked a small school of big bream holed up in a dig they have recently created.
One problem when searching for bream like this is that because you get so close to them you simply spook them! Not ideal and highly frustrating, so the best solution is to note the area and return at a different phase of the tide for a full on assault. Many tournament anglers who undertake this exact preparation during pre-fish days leading up to an event. This is a particularly useful exercise if you are fishing a new system.
Another option, rather than waiting for an entire tidal shift, is to continue searching the next few bays, points or shorelines, and then return to the area you previously spooked some fish. This break away from the area should allow the fish time to settle and there is every chance they will be back on the job when you return. Over the course of a day’s fishing it pays to be vigilant and keep an eye out for likely areas. If the area doesn’t fire on a particular day, return the following day, as bream are known to move reasonable distances within a system, over winter, searching for food.
East Facing Shores
Highly productive areas are shorelines and shallow points that have slightly warmer water temperatures than the surrounding region. There are numerous locations that fall into this category. East facing shorelines exposed to the early morning sun are prime areas to look for black bream and yellowfin bream . The western shorelines on any waterway that has clear, unimpeded exposure to the first rays of sunlight after dawn are one of my ‘go to’ locations to fish through the mid-morning period. The water adjacent to these shorelines will warm faster than the rest of the waterway and we have found that often a temperature increase by a single degree or two can spawn substantially more activity in the area.
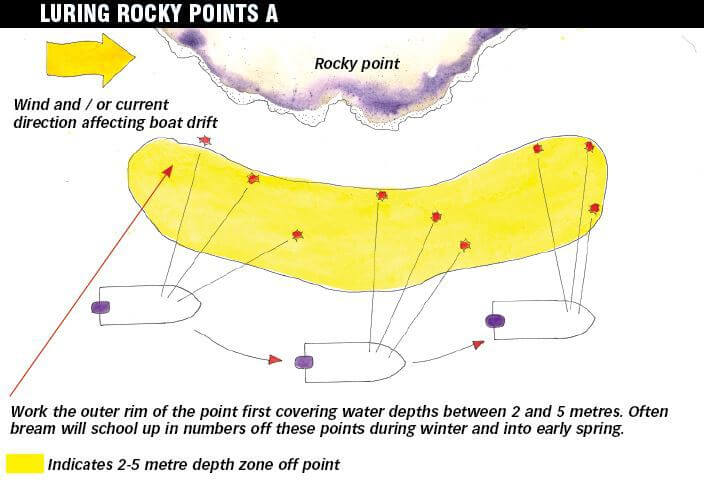
An oversight by many fishers is that they think the bream are attracted to the warm water. This is not entirely true as bream are quite adept at prospering in cold water; however, it is the increase in microorganisms and plant life that attracts tiny foraging fish which in turn brings the bream in. If these shorelines have a mix of rocky points, bays and inlets then you have found the perfect ingredients for some hot winter action. Ppt to fish the points first before moving into large bays as schooling fish will often hold in that 2 to 5 m depth off the points (See TECH TIP – Luring Rocky Points).
Some of our best bream have been taken from these minute rocky point features. Minimise the use of your electric motor along these points as constant ‘clunking’ of the motor engaging or changing direction can alert wary bream to your presence. Initial approach to these areas should be slow and cautious with minimal wave action from the boat. Come in from up current or up wind so that the waves from your boat mix with the natural occurring swells and wave action from the wind or tide. Also pay attention to where the sun is and if any shadows from the boat or anglers will be cast over potential fish holding water. The other important factor when working points and bays is to make as long a casts as possible so that you reach areas where noise hasn’t quite affected the fish yet.
Shallows
Flats and back waters are warm water zones that are intermittent tidal areas consisting of predominantly dark mud bottoms. The reason for this is also quite simple. The dark mud on the bottom will attract and hold the heat longer than other areas. The water sitting on top of this dark bed will be marginally warmer than those with white, light brown or bone coloured bottoms. These areas fish best around the top of the high tide and on a receding tide. The key is to avoid any cold water originating from deep water nearby which is why the dropping tide seems to produce the best results. Occasionally on a rising tide cold water will push up onto these dark bottoms and alter the water temperature; causing foraging fish.
Creek and narrow bay entrances are prime locations for feeding bream. Slim profile soft plastic minnow type bodies are top of my list of bream tactics to work in such areas. Natural greens, browns and purples have proven their worth over many seasons. Narrow, slender shaped diving hardbody minnows will also produce bream.
Another well-documented section of estuarine systems that thrives in winter is shallow backwaters among the extremities of a waterway. The reason the extremities are so productive at this time of year is due to the minimal influence from the cold oceanic waters that flood the waterway every incoming tide. By the time the incoming water reaches the far sectors of a system, the water will have mixed with other water, therefore mitigating the cold temperatures of the open ocean.
If these backwaters are lined with reeds or mangroves then they are like mini, self-sufficient ecosystems. They will have a consistent source of nutrients in the form of weed beds, micro-organisms and a host of foraging creatures, which makes it like the proverbial ‘swim-in, all you can eat’ smorgasbord for the fish. Big bream will spend the better part of winter in these areas feeding and increasing weight prior to spawning. Be warned that the same areas will hold some oversized flathead so if you opt to tie on one of those top of the range hardbodies it may finish up in the bucket mouth of a hungry lizard.
Success on bream is just a matter of being prepared to spend some time searching for the right areas. With a mix of lure styles at hand and being willing to experiment with all genres of lures, that hot winter bite is only the next bay or point away. It’s time for those wonderful short, cool winter days where the epoxy on high-end graphite rods crack under the pressure of a hefty blue nosed bream, so hook up the boat and hit the water now.
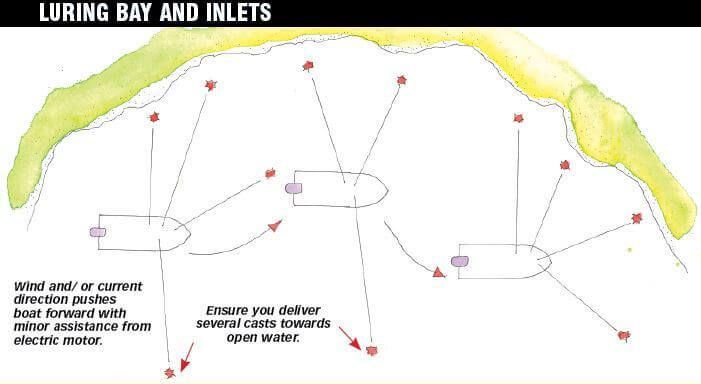
TECH TIP: HOW TO WORK BAYS AND INLETS

- Don’t just focus on the edges
- Work forward of the boat and occasionally out into open water
- Cover all depth variations
- Use a mix of lure styles
- Work suspending and sinking minnows ultra slow when plenty of pauses
- Plastics can be hopped and ripped
- With blades use a short draw and drop method
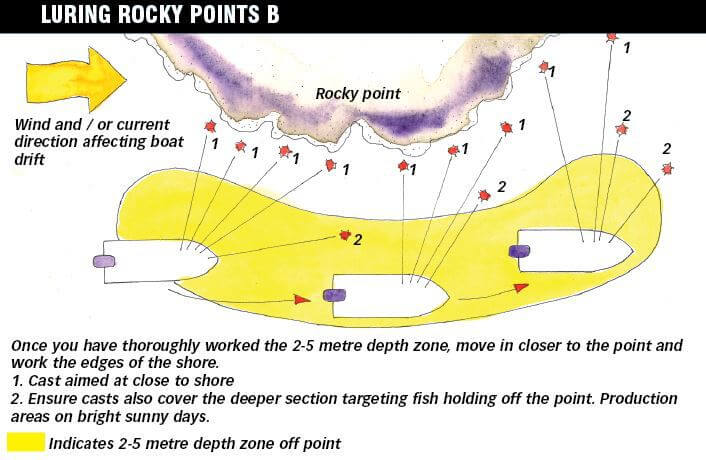
TECH TIP: LURING ROCKY POINTS
When working points, minimise the amount you use your electric motor as this can alert fish in heavily fished waterways. Use a combination of wind and current drift supplemented with minor direction adjustments and propulsion forward via the electric motor.


- Start at the 2 to 5 m depth and mark off points before moving in to fish the edges
- Cover water using a mix of plastics and blades
- Use small hops and long lifts during different retrieves to see which method is working best
- Once deeper water has been covered sufficiently then move in closer
- Fish the edge of shore with hardbodied suspenders and plastics
- Make casts into front of boat for fish holding further out
TECH TIP: WINTER HOT SPOTS
- Western shorelines that receive early sunlight
- Dark mud bottoms
- Shallow backwaters that have minimal influence from tides
- The extremities of an estuary system away from the cold influx of water from the ocean

